Where is the Catalytic Converter Located on a Chevy Cavalier? A Comprehensive Guide

The catalytic converter on a Chevy Cavalier is located underneath the vehicle, along the exhaust system, between the exhaust manifold and the muffler. The exact position along this exhaust path shifts slightly depending on the model year and engine size — earlier Cavaliers place the converter closer to the engine, while later models position it further down the exhaust line.
Knowing this location helps with 3 practical tasks: inspecting the converter for damage, diagnosing exhaust and emissions problems, and planning a replacement. This guide covers the Cavalier catalytic converter location by model year, the 5 main signs of converter failure, replacement costs, and 5 maintenance steps that extend converter life.
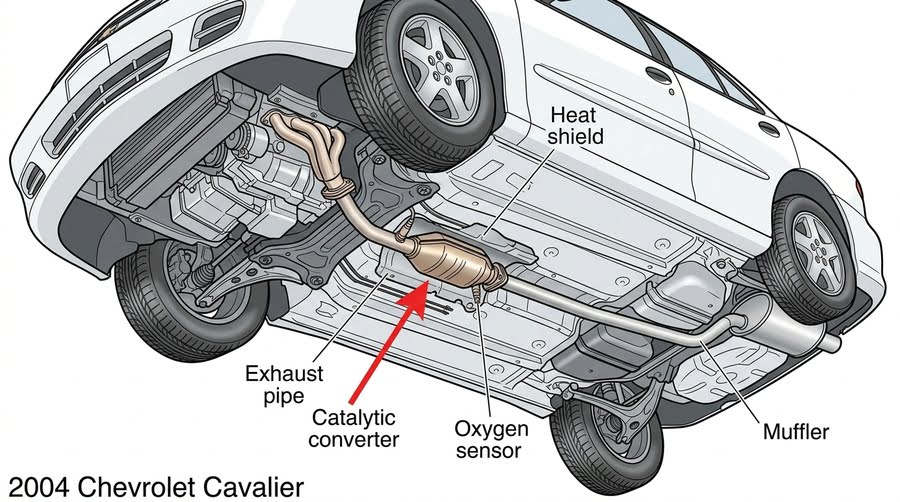
The Chevy Cavalier exhaust system consists of 4 main components relevant to this topic: the exhaust manifold, the catalytic converter (cat), the oxygen sensors (O2 sensors), and the muffler. The cat sits between the manifold and muffler, wrapped in a metal heat shield, connected at both ends by bolt flanges or welded joints depending on the production year.
Introduction to the 1995-Present Chevy Cavalier
The Chevrolet Cavalier is a compact car produced by General Motors (GM) from 1982 through 2005, with the most commonly referenced generations spanning 1995 to 2005. The 1995 Chevy Cavalier — the generation familiar to forum users like KANDELARIA13 on 2carpros.com — used either a 2.2L or 2.4L four-cylinder engine paired with a front-wheel-drive layout.
The Cavalier’s front-wheel-drive, transverse-mounted engine setup directly affects where the catalytic converter sits in the exhaust system. Because the engine sits sideways in the engine bay, the exhaust manifold exits toward the firewall side of the engine, and the exhaust pipe runs down and under the vehicle toward the rear. The cat mounts along this path, under the floorpan, between the front axle area and the midsection of the vehicle.
The 2.2L engine was the base option and the most common in 1995-2002 Cavaliers. The 2.4L twin-cam engine appeared in higher trims and later model years. Both engine sizes use a catalytic converter, but the exact mounting position along the exhaust pipe differs between the two, which is covered in the model-year section below.
GM discontinued the Cavalier in 2005, but parts availability remains strong through suppliers like Daysyore Auto Parts, which stocks direct-fit catalytic converters, oxygen sensors, and related exhaust components for GM vehicles including the Cavalier, Cadillac Escalade, Silverado, and GMC Sierra 1500.
Purpose of a Catalytic Converter
A catalytic converter reduces harmful gases in vehicle exhaust before those gases exit the tailpipe. The converter processes 3 primary pollutants: carbon monoxide (CO), unburned hydrocarbons (HC), and nitrogen oxides (NOx). Through chemical reactions triggered by a precious metal catalyst — typically platinum, palladium, and rhodium — these pollutants convert into carbon dioxide (CO₂), water vapor (H₂O), and nitrogen (N₂).
The catalytic converter in a Chevy Cavalier serves 4 functions:
- Emissions compliance — The cat keeps exhaust output within the limits set by federal and state environmental regulations. Without a functioning converter, the Cavalier fails emissions testing.
- Engine efficiency — A clean, unobstructed converter maintains proper exhaust backpressure, which supports fuel combustion efficiency and throttle response.
- Sensor performance — The converter works in coordination with upstream and downstream oxygen sensors. These sensors monitor exhaust gas composition before and after the cat, feeding data to the engine control module (ECM) to regulate the fuel-air mixture.
- Environmental protection — Converting NOx, CO, and HC into less harmful compounds reduces the Cavalier’s contribution to air pollution and smog formation.
A working catalytic converter directly affects how the engine runs. A clogged or degraded cat restricts exhaust flow, increases backpressure, and causes measurable drops in power output and fuel economy. Ignoring converter problems leads to damage to the oxygen sensors and, in severe cases, engine overheating.
The internal structure of a Chevy Cavalier catalytic converter contains 4 main components:
- Metal housing — The outer shell, typically stainless steel, that contains the internal components and connects to the exhaust pipe.
- Ceramic honeycomb substrate — A porous ceramic structure with thousands of small channels that maximize surface area for exhaust gas contact.
- Precious metal catalyst coating — Platinum, palladium, and rhodium applied to the substrate surface to trigger the chemical conversion reactions.
- Heat shield — A metal guard surrounding the outside of the converter housing that protects surrounding underbody components from the extreme heat the cat generates during operation.
Location of the Chevy Cavalier Catalytic Converter
The catalytic converter on a Chevy Cavalier is located underneath the car, along the exhaust pipe, positioned between the exhaust manifold at the front and the muffler toward the rear. To find it, follow the exhaust pipe from the engine downward and rearward — the cat is the enlarged, cylindrical or oblong metal component you encounter before the pipe continues back to the muffler.
To inspect the Chevy Cavalier catalytic converter location directly, follow these 5 steps:
- Raise the vehicle using jack stands or drive-up ramps, ensuring the car is fully supported and stable before going underneath.
- Locate the exhaust manifold on the engine — on the Cavalier’s transverse-mounted engine, this is the cast-iron or stainless component bolted directly to the cylinder head on the firewall side.
- Follow the exhaust pipe as it exits the manifold, runs down through the engine bay, and passes under the vehicle floorpan.
- Identify the catalytic converter — it is noticeably larger in diameter than the surrounding exhaust pipe, typically 12–18 inches (30–46 cm) long, and covered by a metal heat shield secured with small bolts or clamps.
- Note the connection points — the cat connects to the exhaust pipe on both ends via bolt flanges (on bolted assemblies) or welded joints (on integrated assemblies). The upstream oxygen sensor threads into the exhaust pipe just before the converter inlet, and the downstream oxygen sensor threads in just after the converter outlet.
On 1995–2002 Chevy Cavaliers with the 2.2L engine, the catalytic converter sits relatively close to the engine — approximately 12–18 inches (30–46 cm) downstream from the exhaust manifold. This close placement helps the cat reach operating temperature quickly for effective emissions control during cold starts.
On 2003–2005 Cavaliers and models with the 2.4L engine, the cat position moves slightly further down the exhaust line, closer to the mid-chassis area, which improves heat management and extends converter lifespan.
In all Cavalier model years, the cat is visible from underneath the vehicle without removing any major components. A flashlight and a mechanic’s creeper make the inspection straightforward.
Why Location Varies by Model Year
The precise catalytic converter placement in a Chevy Cavalier changes across model years for 3 main reasons: engine size differences, evolving emissions regulations, and exhaust heat management requirements.
Engine size differences:
The 2.2L engine produces less exhaust heat than the 2.4L engine. To compensate and ensure the catalyst reaches its minimum operating temperature — approximately 400–600°F (204–316°C) — the 2.2L Cavalier places the converter closer to the exhaust manifold. The 2.4L engine generates more heat, so the converter can sit slightly further down the exhaust path without losing conversion efficiency during cold starts.
Emissions regulation changes:
GM updated the Cavalier’s exhaust system layout across production years to meet tightening federal emissions standards. Pre-2000 models used a converter placement optimized for the emissions rules of that era. Post-2000 models incorporate updated converter positioning and additional oxygen sensor placements — including Nitrogen Oxygen Sensor configurations on some trims — to meet stricter requirements.
Exhaust heat management:
Positioning the converter closer to the engine exposes surrounding underbody components to more radiant heat. Later Cavalier models moved the converter slightly further from the engine and added improved heat shield designs to reduce heat damage to nearby fuel lines, wiring, and chassis components.
The result is that a 1995 Chevy Cavalier and a 2004 Chevy Cavalier have the converter in the same general location — underneath the vehicle, between manifold and muffler — but the exact distance from the manifold and the specific mounting geometry differ between the two. Consult the owner’s manual or a factory service guide for the precise measurements on a specific model year before ordering replacement parts. Suppliers like Daysyore Auto Parts list catalytic converters by year and engine size to ensure direct-fit compatibility.
Signs of a Failing Catalytic Converter
There are 6 common signs of a failing catalytic converter on a Chevy Cavalier:
- Check Engine light — The most frequent indicator. The ECM monitors converter efficiency through upstream and downstream oxygen sensor readings. When conversion efficiency drops below the threshold, the ECM triggers a diagnostic trouble code (DTC) and illuminates the Check Engine light.
- Reduced engine power and acceleration — A clogged converter restricts exhaust flow, increasing backpressure in the exhaust system. The engine cannot expel exhaust gases efficiently, which reduces combustion performance and causes noticeable power loss, especially under load.
- Rotten egg or sulfur smell from the exhaust — A functioning converter converts hydrogen sulfide in the exhaust into odorless sulfur dioxide. A failing or clogged converter allows hydrogen sulfide to pass through unconverted, producing a distinct rotten egg smell at the tailpipe.
- Rattling noise from under the vehicle — The ceramic honeycomb substrate inside the converter can crack or break apart, especially after physical impact from road debris or severe overheating. Broken substrate pieces rattle inside the converter housing, producing a metallic rattling sound that increases with engine RPM.
- Failed emissions test — A converter operating below minimum efficiency produces exhaust with pollutant levels exceeding legal limits. The vehicle fails the emissions inspection.
- Engine stalling or rough idle — A severely clogged converter blocks exhaust flow enough to cause the engine to stall at idle or run roughly. This is a late-stage symptom indicating the converter requires immediate replacement.
Faulty upstream or downstream oxygen sensors produce symptoms similar to converter failure, including Check Engine lights and poor fuel economy. Diagnose the converter with a professional scan tool before replacing parts. Daysyore Auto Parts offers oxygen sensor sets for GM vehicles including the Chevy Silverado, Suburban, and related GM platforms — verifying sensor function first prevents replacing a functioning converter unnecessarily.
Replacement Cost and What to Expect
Replacing the catalytic converter on a Chevy Cavalier costs between $400 and $1,500 (USD) total, including parts and labor, depending on whether an OEM (original equipment manufacturer) or aftermarket converter is used, the model year, and local labor rates.
The cost breakdown for a Chevy Cavalier catalytic converter replacement has 3 components:
| Component | Cost Range |
|---|---|
| OEM catalytic converter (parts only) | $200–$800 |
| Aftermarket catalytic converter (parts only) | $80–$300 |
| Labor (1–3 hours at $100–$150/hr) | $100–$450 |
Bolted converter assemblies cost less to replace in labor because no cutting or welding is required. Welded converter assemblies require professional cutting of the exhaust pipe and welding of the new converter, adding 30–60 minutes of labor time.
Before replacing the converter, take 3 diagnostic steps:
- Scan for diagnostic trouble codes to confirm the converter is the actual source of the fault, not a failing oxygen sensor producing false converter efficiency readings.
- Inspect for exhaust manifold leaks upstream of the converter. A manifold leak introduces unburned oxygen into the exhaust stream before the cat, causing the downstream sensor to read inaccurately and triggering false converter fault codes.
- Check the upstream and downstream O2 sensors for individual failure. Daysyore Auto Parts stocks oxygen sensor sets for GM vehicles including the 2008–2014 Cadillac Escalade platform and 2014–2018 Chevy Silverado Suburban applications, which share sensor designs with related GM platforms.
Removing or bypassing a catalytic converter to avoid replacement cost is illegal under federal emissions law and results in an automatic emissions test failure. Driving without a functioning converter damages the oxygen sensors and ECM over time due to abnormal exhaust gas readings.
Maintenance Tips to Extend Converter Life
There are 5 maintenance practices that extend the service life of a Chevy Cavalier catalytic converter:
- Fix engine misfires immediately. Misfires send unburned fuel into the exhaust system. Unburned fuel ignites inside the converter, generating temperatures that exceed the substrate’s thermal limit — typically above 1,400°F (760°C) — and destroys the catalyst coating.
- Use quality fuel. Low-grade or contaminated fuel increases carbon deposits on the ceramic substrate, reducing the converter’s ability to process exhaust gases and restricting exhaust flow over time.
- Repair exhaust leaks upstream of the converter. Any exhaust leak between the manifold and the converter inlet allows unmetered air into the exhaust stream, which disrupts the oxygen balance the converter and O2 sensors depend on for proper operation.
- Monitor oxygen sensor function. Faulty upstream O2 sensors cause the ECM to run a rich fuel mixture, sending excess unburned hydrocarbons through the converter and overloading the catalyst. Daysyore Auto Parts stocks replacement oxygen sensors and Nitrogen Oxygen Sensor components for a range of GM vehicles.
- Inspect the heat shield and converter housing regularly. Road debris impact, rust, and corrosion damage the heat shield and converter housing. A loose or missing heat shield exposes the converter to physical damage and reduces thermal protection for nearby underbody components. Check the heat shield during every oil change or undercarriage inspection.
Following these 5 practices reduces the likelihood of premature converter failure and avoids the $400–$1,500 replacement cost.
Changing the Converter: What You Should Know
To change the catalytic converter on a Chevy Cavalier, allow the exhaust system to cool completely — at least 2 hours after the last engine run — before starting work. The converter housing reaches temperatures exceeding 1,200°F (649°C) during operation and retains heat for an extended period after shutdown.
There are 2 converter assembly types found on the Chevy Cavalier, and the replacement process differs between them:
Bolted converter assembly:
- Raise the vehicle on jack stands or ramps with full undercarriage support.
- Spray penetrating oil on all flange bolts and allow 10–15 minutes of soak time.
- Remove the upstream and downstream oxygen sensor connectors.
- Unthread the O2 sensors from the exhaust pipe using an oxygen sensor socket.
- Remove the flange bolts at both converter connection points.
- Remove the old converter and heat shield assembly.
- Install the new converter with new flange gaskets and torque the bolts to the manufacturer specification.
- Reinstall the O2 sensors and reconnect the sensor wiring.
Welded converter assembly:
- Welded assemblies require cutting the exhaust pipe at both ends of the converter using a reciprocating saw or angle grinder with a cutting disc.
- The new converter welds into place using exhaust welding equipment. This step requires a professional welder or exhaust shop unless you have the equipment and experience.
- Some aftermarket replacement converters for the Cavalier use bolt-flange ends even for models originally welded from the factory, simplifying the installation.
After installing the new converter, start the engine and run it to operating temperature. Check all connection points for exhaust leaks — a soapy water solution applied around the flanges shows bubbles at any leak points. Clear any stored diagnostic trouble codes using an OBD-II scanner. Retest the vehicle for emissions compliance after the converter has completed several heat cycles.
FAQs
Where exactly is the catalytic converter on a Chevy Cavalier?
The catalytic converter is located underneath the Chevy Cavalier, along the exhaust pipe, between the exhaust manifold and the muffler. Follow the exhaust pipe from the engine downward and rearward — the converter is the enlarged metal component covered by a heat shield, approximately 12–24 inches (30–61 cm) downstream from the exhaust manifold depending on the model year.
Can you see the catalytic converter from under the car?
Yes. The catalytic converter is visible from underneath the Chevy Cavalier without removing any panels or covers. Raise the car on jack stands or ramps, look along the exhaust pipe running from front to rear, and identify the larger-diameter metal component with the heat shield.
What does the catalytic converter look like on a Chevy Cavalier?
The catalytic converter on a Chevy Cavalier looks like an enlarged, cylindrical or oval-shaped metal canister approximately 8–16 inches (20–41 cm) long and 4–6 inches (10–15 cm) in diameter. A metal heat shield surrounds the outer housing and is typically secured with small bolts or clamps.
Is it safe to drive a Chevy Cavalier with a bad catalytic converter?
No. Driving with a severely clogged or failing converter causes power loss, increases harmful exhaust emissions, risks engine overheating from blocked exhaust flow, and results in emissions test failure. A rattling converter indicates broken substrate, which can fully block exhaust flow and stall the engine.
How much does a Chevy Cavalier catalytic converter replacement cost?
Replacing the catalytic converter on a Chevy Cavalier costs between $400 and $1,500 total, covering parts and labor. OEM converters cost more than aftermarket units but ensure emissions compliance and direct fitment.
How often does the catalytic converter need inspection on a Chevy Cavalier?
Inspect the catalytic converter every 15,000–30,000 miles (24,000–48,000 km) or whenever the Check Engine light activates, exhaust performance changes, or a sulfur smell appears at the tailpipe.
Can a clogged catalytic converter cause a Chevy Cavalier to stall?
Yes. A severely clogged converter restricts exhaust gas flow enough to build excessive backpressure, causing the engine to stall at idle or lose power under acceleration.
Is removing the catalytic converter on a Chevy Cavalier legal?
No. Removing or bypassing the catalytic converter violates federal emissions regulations and state environmental laws. The vehicle fails emissions testing and the owner faces fines.
What causes early catalytic converter failure on a Chevy Cavalier?
The 3 most common causes of early converter failure on a Chevy Cavalier are engine misfires sending unburned fuel through the exhaust, oil or coolant leaks contaminating the substrate, and physical damage from road debris impact.
Conclusion
The catalytic converter on a Chevy Cavalier is located underneath the vehicle, along the exhaust system, between the exhaust manifold and the muffler. The exact position along the exhaust pipe varies by model year and engine size — 1995–1999 models with the 2.2L engine place the converter closer to the manifold for faster warm-up, while 2000–2005 models position the converter slightly further down the exhaust line for improved heat management and converter longevity.
Identifying the Cavalier catalytic converter location requires raising the vehicle safely on jack stands or ramps, following the exhaust pipe from the engine toward the rear, and locating the enlarged, heat-shield-covered metal component connected at both ends to the exhaust pipe. Upstream and downstream oxygen sensors thread into the exhaust pipe immediately before and after the converter.
The 6 signs of a failing converter — Check Engine light, power loss, rotten egg exhaust smell, rattling noise, emissions test failure, and engine stalling — each indicate the converter or related exhaust system components need inspection. Replacing a failed converter costs between $400 and $1,500 depending on parts and labor, and the 5 maintenance practices of fixing misfires, using quality fuel, repairing upstream leaks, monitoring O2 sensors, and inspecting the heat shield extend converter service life and reduce long-term repair costs.
Suppliers like Daysyore Auto Parts carry direct-fit catalytic converters, oxygen sensors, and exhaust system components for GM vehicles including the Chevy Cavalier, Silverado, and related platforms, making part sourcing straightforward for both DIY repairs and professional shop installations.